Wednesday, July 14, 2010

let the halloween preparations begin!

our haunted parlor at halloween...

if you are even a casual reader of my blog, you likely know that i am an absolute fanatic about halloween...even my shop is stocked year-round with halloween confections.


the hatbox ghost, the crafty witch, and a furry sceptre...

i was blessed as a kid to have a mom who was happy to sew whatever costume i requested, as well as an older cousin who lived just up the street who would take me and my brother and sister trick or treating not only on halloween night, but on beggar's night too. oh, and halloween just happens to be my mom's birthday (lucky, lucky!), so we almost always have some sort of samhain celebration from year to year.


one of my hand-carved pumpkins


so, naturally, i've already begun thinking about what i am going to craft up for halloween this year...and not just items for the shop. costumes, spooky decor projects, and home haunt projects...my brain is always spinning when it comes to halloween.


a witchy label from LOVEMANOR.COM


last year, i came across these fantastic labels for a 'witch's cupboard' at the Love Manor blog...they are meticulously designed and look incredibly authentic when adhered to old antique glass bottles and jars. i was so thrilled when i came across them, i just had to pick up a bunch of antique glass bottles the next time i was out junking and thrifting. this project could not be easier, and the results are so authentic, it will surely fool any spooky guests that should come calling on this hallow's eve.

here is what you need:
  • old glass bottles, jars (or newer ones, with their labels and glue removed)
  • mod podge
  • sponge brush
  • walnut ink, or walnut stain (pad, spray, or crystals work just fine)
  • labels, which you can find HERE
here is how you do it:
  1. make sure all of your glass jars and bottles are clean and dry
  2. decide which label will go on which jar, and use a photoshop program (picnik.com) to edit the image so it will fit on your jar. print out, and cut along edges
  3. apply mod podge to area where you wish to adhere your label, place label onto bottle and smooth out bubbles and edges.
  4. wipe away any excess mod podge from the glass surrounding the label.
  5. once dry, use some walnut ink on a cotton pad or paper towel and gently buff the label around its edges to give it an aged, worn appearance.
  6. embellish your bottle with moss, just twine, spiders, etc. i like to keep my witchy bottles and jars looking as authentic as possible for a more convincing effect.
  7. display on a shelf, an old silver tray, or table top along with an iron cauldron and lots of candles.
a witchy apothecary ready for casting spells...

see how easy that was? so while you're out and about this summer, strolling through flea markets and yard sales, keeps your eyes peeled for some vintage looking glass bottles and turn them into something frighteningly fantastic!

Thursday, June 10, 2010

you'll find me in the garden...

pansies waiting to be planted in my garden...


its true. if the sun is out, i am out in my little patch of green happiness. planting...pruning...seeding...rearranging. i quite literally look for reasons to keep myself busy out there poking in the dirt.

an early pic of our house in the city, built 1905.

its an obsession that began when we purchased our first and current home here in the city. we are fortunate enough to be in a fantastic historical district near buffalo's hub. its got all the luxury of neighborhood living within minutes of downtown. i love my old home, but its definitely a work in progress. and admittedly, i have a lot planned for the green space around my house. we've tackled some of the major hardscaping projects already, like ripping out a rotting old deck and brick courtyard in the backyard as well as rebuilding the stone wall around the front yard's bed.

each year i add more and more, grooming and restoring our little abode to its former 1905 glory. i dream of brunches in the warm sunshine of my terrace, surrounded by a lush cottage garden full of mystery and charm...of candlelit dinners amongst the fireflies and fragrant peonies. there are moments, at the end of a day spent toiling amongst the blooms, where i will pause and look out at my little patch of life, and i see that mon petit jardin is creeping closer and closer to my flower-filled fantasies.

a nearby neighborhood home, part of the buffalo ny garden walk.

but if you really want to know, my ultimate goal is to have my home garden be included in our city's annual Garden Walk event. occurring each year at the end of july, just when all the area gardens are at their vegetative peak, hundreds and hundreds of homes around the city and surrounding areas open their gardens for people to wander through and admire. i try to catch a new neighborhood or area each year, taking photos and gathering ideas for my own greenspace. its astounding what some people can do with a small space, a few plants, and some sweat! believe me, buffalo is not 10 straight months of snow and cold. though the winds may blow and the snow may fall (really only a few inches each season), i assure you that our harsh and oft publicized wicked winters melt away into some of the most beautiful spring and summer weather in the country.

a charming entry to another secret garden on the Garden Walk.


so if you've been stopping by only to find the 'be back in 10 min' sign still hanging on the door, i kindly apologize, but i've been enjoying the lure of my garden and the beauty of our unusually early summer weather. and i certainly hope you all have been cultivating your own bit of green in your own neck of the woods. oh, i still have work to do in the shop...gobs of custom birthday orders and a new halloween line in the works. it just has to wait for a rainy day...

happy summer!

Saturday, May 8, 2010

a little peek...

a nautical themed birthday banner for one very lucky little boy...
(and yes, that is burlap and seersucker you see! i work with fabrics too!)


glass glitter whales for hanging...
(its going to be one 'whale of a time', don't you know...)


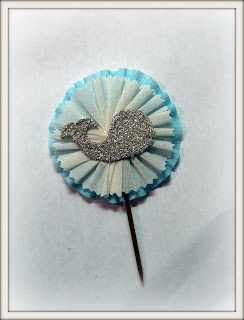
and some very sweet cupcake picks...
(monograms in the works too...)
i've been up to my elbows in glass glitter and crepe and fabric...and loving every moment...hope you're all off revelling in some creativity of your very own...

Thursday, April 15, 2010

this just in...

these pretty silver dresden numbers...

and these lovely silver dresden letters...

and these sweet aqua doves...sigh...

AND!..this! the sparkliest, shiniest, most superb german glass glitter!
and its all available for you now in the shop! i am so excited to be expanding my ICING ON THE CAKE line of vintage inspired embellishments and supplies for all of your own confectionary crafting cravings! i can't wait to share all of my ideas for using these vintage charmers with you very, very soon!

Friday, April 9, 2010

drum roll please!

INTRODUCING, THE 'ICING ON THE CAKE' LINE BY THE CREPE CONFECTIONARY!


i wanted to drop in for just a moment so that i could share some exciting news! in the coming weeks, i am going to be introducing a new line of handmade crafting and decorating embellishments in the shop. you can expect to see the sweetest of crepe paper ruffles, the sparkliest of glass glitters, and the most whimsical of vintage bits and baubles for all your creative pursuits. i call it the 'icing on the cake' line because it consists of the very bits and pieces i handcraft or gather for use in my own artwork...you know, the sweet little details that really add that final touch to a piece.


so now you too can add some vintage charm to just about anything! i absolutely love crepe paper, and i fold and gather it into almost any imaginable machination. and i use it almost everywhere...gift wrapping, party hats, banners, costumes, as garland on my tinsel tree, and even on the edges of my shelves. it adds just the right touch of antiquated charm, no matter what the use. i even go so far as to create my own fringed festooning, reminiscent of the kind once seen in the old Denison Crepe Paper Company's 'Bogie Book'. and yes, this too will be available for sale in the shop, should you be so tempted...

i will even be offering confectionary kits, including do it yourself party hats and other holiday items, for those of you adventurous enough to give yourself a sweet tooth. i don't know about you, but i love disappearing into my craft cave to toil away on something frivilous. i suppose i want to share that sense of respite and whimsy with those of you willing volunteers out there...enjoy the experience, revel in the process, spend time on the tiniest of details, smile at what you accomplish.
so tie an apron on, grab your glue gun, and let the glitter fly!

Tuesday, April 6, 2010

easter treats

(photo Southern Living.com)
did the easter bunny fill your basket full of sweet treats this year? did the sun shine upon y0u and your family? did you feast on ham or lamb? did you find yourself in a sugar coma by sunday evening like i did?
i'm still recovering -- mainly because i am still finishing off the chrusciki leftovers that still haunt me from down in the kitchen. i'm a polish girl, and i am very fortunate to have had a wonderful polish grandma who taught me how to cook and bake and entertain and create. so every year for easter, i pull out the big kitchen aid mixer, my apron, and grandma's recipe for polish angel wing cookies, or chrusciki.


the dough is a basic noodle-type, consisting mainly of egg yolks and flour. it is rolled out, cut into strips with a pastry wheel, and then 'twisted' into the inside-out angel wing knot for which they are most notable. eaten alone and plain, it is a rather bland experience. but give them a heavy dusting with confectioner's sugar, and you have a delectable little treat that you will devour. my grandmother was legendary for hers, and could crank them out by the dozens in no time. she and her sisters owned and operated a catering company, and giant mountains of chrusciki were often on the menu for the hundreds of polish weddings they delivered to the community. i'm the only one left in the family that still knows how to make them, and so i try to make as many as i can so we can indulge in their yumminess and the memory of my grandma.


i was ambitious this year, and decided i would make not one, but two, batches. not so bad, right? well, one batch of dough alone can produce up to 200 (!!) chrusciki! so i knew that i was in for a long saturday. but you know, once i get started cracking those eggs and twisting those wings, i begin to remember...its like she is here with me, standing at the counter with me in my own kitchen, guiding me as i roll the dough or drop them into the oil to cook. i can see her hands in my memory, her long fingers shaping the dough until it was just right. the best part was always sitting down with a cup of coffee and enjoying some when they were all done...


my grandmother was, and continues to be, a shining star for me. a wonderful woman who taught me about more than just eggs and flour or setting tables. she taught me to approach all tasks with integrity, to treat everyone like an honored guest, to make the most of what i have at hand. my morals, my values, and my ethics didn't come from going to catholic school and church on sundays. it came from the time i spent in my grandmother's kitchen, learning the lessons that have done me well thus far in my life.


i guess the moral of my story, my own personal point of view, is that holidays are not necessarily about going to church and worshipping faith myths for me. they are about honoring the love and the memories of the people who have enriched my life. this is what i celebrate, especially this time of year.

Thursday, April 1, 2010

'oh, i could write a sonnet about your easter bonnet...


...and of the girl i'm taking to the easter parade.'

sigh. i'm a girl who loves old movies. surprised? i didn't think so...but not just any old movie. there has to be something that draws me in and keeps my attention. i need a little glam, a little drama, breathtaking sets, song, and especially dance! so yes, Easter Parade happens to fit the bill quite nicely. if you haven't had the pleasure, i emphatically endorse it as a great movie to get you in the mood for spring and for the easter holiday. what a nice way to spend easter sunday evening, no?

its silly, but i often found myself humming the old irving berlin tune that was the highlight of the movie as i crafted away in the studio glittering eggs and embellishing bunnies. i have been enjoying the welcomed early arrival of spring on the doorstep of western new york for almost a month now, and i am finding that it has really helped fuel my creative energies...like the sun warming all my tender little plants in the garden so that they peek their heads up from the soil and bloom.
so i thought i would share some of my springtime creative zeal with you, and show you a little project i did this past week in preparation for the easter holiday...


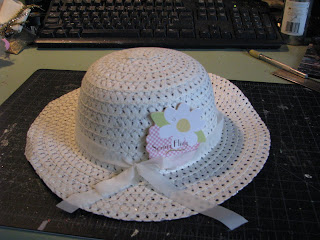
i was strolling through my neighborhood Dollar Tree stocking up on my basics -- white craft glue, tinsel, stryofoam, and crepe paper (because it makes absolutely no sense to overpay for such items) -- when i stumbled upon this cute little straw hat in the seasonal area. it immediately reminded me of the one i had as a child, and how i would wear it to church on sundays and for other special occasions. but once i was done reminiscing about my lost youth, i had a light bulb moment wherein i was sure that i could turn this dollar store straw hat into a darling little easter bonnet for display somewhere in ma petite maison...


i set about looking through the store for other supplies i could use to embellish my little bonnet. on this occasion, my Dollar Tree also happened to be stocked up with some really lovely silk flowers in pale pinks and creamy chartreuse whites. now, allow me to take a moment to address dollar store flowers and silk flowers in general -- i don't really like them. lol...i know, i know. i am not very elitist when it comes to my crafting or my decor, but i have always strongly despised fake flowers. i see their utility, but they just never, ever look as good as the real thing. but sometimes, as was the case on this day, they are a necessary evil. furthermore, these were so lovely and i knew that i could "vintage" them up a bit with some sand paper once i got them home.


so with my dollar store straw hat and my dollar store silk flowers, i scampered off home to make an easter bonnet of my very own. i gathered up some extra fixings for the hat including some vintage velvet millinery leaves, pearl stamens, vintage forget me nots, ribbon, and tulle. you'll notice in the picture above that i replaced the paper ribbon on the hat with a silk ribbon in a soft sage (a Pottery Barn wrapping castoff), and i also added a few tufts of white tulle that was leftover from a sewing project. i pulled a few of the silk roses off of their stems and took some sandpaper to the edges to make them look more aged. since the hat was sized for a child, i only chose to use about three of the blooms, and i kept the pallette a bit more restrained. i added a green velvet leaf and some pearl stamens to one of the blooms, and decided to stop there for fear that i would overdo it.
now how easy was that? this project literally took about fifteen minutes to complete, and it cost less than five dollars to make! vintage charm for just pennies...
so i hope that this inspires you to indulge in some last mintue spring crafting. celebrate the season and welcome mother nature back into your home! happy spring!