Showing posts with label crafting. Show all posts

Friday, October 8, 2010

a little halloween inspiration...

as to be expected, the last few weeks have been full of hustle and bustle for The Crepe Confectionary...

between a mound of halloween and custom orders for the shop, and taking a little time to enjoy the Country Living Fair in Ohio with my mom, i've been eating, sleeping, and breathing halloween...and i couldn't be happier!

so i thought that i would share with you some of the great ideas i've stumbled upon for scaring up some truly inspiring tricks and treats...


i love these handmade treat bags crafted from old dictionary pages, and this idea couldn't be hotter right now. it seemed that everywhere i turned at this year's Country Living Fair, there were these beautiful handmade items reusing old book pages. for this bibliophile, i couldn't be more smitten with the look...


now this idea, i have vowed to make for halloween this year, its just too cool not to! and believe me, it is a lot easier than it looks...all you need are two little LED lights and a couple of watch batteries -- both of which you can get at your local hardware store for just a couple of dollars. i've already started going through my mom's old photo albums for good pictures...i'll post a more detailed how-to, promise!

one day, i will host my mom's halloween birthday dinner in a setting such as this...doesn't it look absolutely magical?


but for now, i think i could definitely do this in my own dining room. i am completely taken with the vintage charm of this dining room, decked out with orange and black crepe paper festoons and tissue lanterns...its straight from the pages of a Dennison Bogie Book.


and these...(sigh)...these velvet pumpkins have completely seduced me this fall season...i saw them a few months ago on the web somewhere, and a number of vendors had them at this year's Country Living Fair. to buy them, they are quite pricey...but i assure you that their construction is incredibly simple! in fact, if you check back here in the next few days, i will post a step by step tutorial on how to construct some of these soft, lush lovelies for yourself!
until then, may all your endeavors be crafty ;)

Thursday, April 1, 2010

'oh, i could write a sonnet about your easter bonnet...


...and of the girl i'm taking to the easter parade.'

sigh. i'm a girl who loves old movies. surprised? i didn't think so...but not just any old movie. there has to be something that draws me in and keeps my attention. i need a little glam, a little drama, breathtaking sets, song, and especially dance! so yes, Easter Parade happens to fit the bill quite nicely. if you haven't had the pleasure, i emphatically endorse it as a great movie to get you in the mood for spring and for the easter holiday. what a nice way to spend easter sunday evening, no?

its silly, but i often found myself humming the old irving berlin tune that was the highlight of the movie as i crafted away in the studio glittering eggs and embellishing bunnies. i have been enjoying the welcomed early arrival of spring on the doorstep of western new york for almost a month now, and i am finding that it has really helped fuel my creative energies...like the sun warming all my tender little plants in the garden so that they peek their heads up from the soil and bloom.
so i thought i would share some of my springtime creative zeal with you, and show you a little project i did this past week in preparation for the easter holiday...


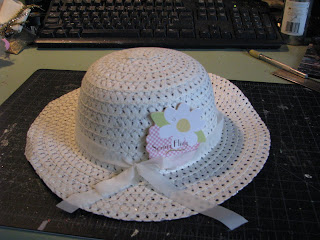
i was strolling through my neighborhood Dollar Tree stocking up on my basics -- white craft glue, tinsel, stryofoam, and crepe paper (because it makes absolutely no sense to overpay for such items) -- when i stumbled upon this cute little straw hat in the seasonal area. it immediately reminded me of the one i had as a child, and how i would wear it to church on sundays and for other special occasions. but once i was done reminiscing about my lost youth, i had a light bulb moment wherein i was sure that i could turn this dollar store straw hat into a darling little easter bonnet for display somewhere in ma petite maison...


i set about looking through the store for other supplies i could use to embellish my little bonnet. on this occasion, my Dollar Tree also happened to be stocked up with some really lovely silk flowers in pale pinks and creamy chartreuse whites. now, allow me to take a moment to address dollar store flowers and silk flowers in general -- i don't really like them. lol...i know, i know. i am not very elitist when it comes to my crafting or my decor, but i have always strongly despised fake flowers. i see their utility, but they just never, ever look as good as the real thing. but sometimes, as was the case on this day, they are a necessary evil. furthermore, these were so lovely and i knew that i could "vintage" them up a bit with some sand paper once i got them home.


so with my dollar store straw hat and my dollar store silk flowers, i scampered off home to make an easter bonnet of my very own. i gathered up some extra fixings for the hat including some vintage velvet millinery leaves, pearl stamens, vintage forget me nots, ribbon, and tulle. you'll notice in the picture above that i replaced the paper ribbon on the hat with a silk ribbon in a soft sage (a Pottery Barn wrapping castoff), and i also added a few tufts of white tulle that was leftover from a sewing project. i pulled a few of the silk roses off of their stems and took some sandpaper to the edges to make them look more aged. since the hat was sized for a child, i only chose to use about three of the blooms, and i kept the pallette a bit more restrained. i added a green velvet leaf and some pearl stamens to one of the blooms, and decided to stop there for fear that i would overdo it.
now how easy was that? this project literally took about fifteen minutes to complete, and it cost less than five dollars to make! vintage charm for just pennies...
so i hope that this inspires you to indulge in some last mintue spring crafting. celebrate the season and welcome mother nature back into your home! happy spring!

Thursday, January 28, 2010

and the coffee filter insanity continues...


yes, it's true...

i am still playing with dyed coffee filters...and i'm still completely taken with the aesthetic concept. its so...fluffy. and romantic. and just plain cheap. AND so simple to do. in the last week or so, i've made a very large pom in a robin's egg blue and taupe for my studio -- this thing ended up being roughly the size, or larger, of a basket ball. it looks so cute hanging in the corner above my sewing table. i plan to do a few more in varying sizes so this one doesn't look too lonely hanging up there by itself. i've also put together this rather large heart that is currently hanging in my entryway. i got the heart-shaped form from Hobby Lobby and just dyed, oh, about two hundred (!) coffee filters pink. it actually didn't take too long. in fact, i thought that the large heart went much more quickly than the smaller heart i showed in my tutorial last week.

what about all of you? have you caught this coffee filter bug yet? if so, what have you whipped up?
this time of year in buffalo can be tough to get through...while we don't really get nearly as much snow as the rest of the world seems to think we do, it can be quite cold and quite gray. i yearn for the sun...the warmth...the garden. its time for me to start my winter sowing, which has turned into quite an ambitious undertaking for me, but one that i am very proud of. last year, i started hundreds of seedlings...all of my perennials and tons of annuals. i only have a small garden in the city (about 20' by 16'), so i ended up gifting a lot of my babies away; but i was so thrilled to have grown nearly all of my garden plants and flowers last year. it was really rewarding to nurse them from tender little seedlings to these lovely flowering beauties, AND i found it helped alleviate some of the winter blues to be looking after something that was alive and growing despite the inches of blowing snow outside the door...

Sunday, January 10, 2010

my newly found obsession: coffee filters and how to dye them


yes, you read correctly. i am currently absolutely obsessed with coffee filters. i'm literally dreaming of them...toying with new ways to use them in my crafting adventures.


and it all began with the latest issue of Somerset Life. now, this is a magazine that i have heard mentioned many times before, but i never really gave it any notice. however i recently found myself killing time at my local Borders, browsing through the magazines. i came across the illustrious Somerset collection of mags, and decided to give them a closer look...
there are a number of Somerset publications, and if you give it a google, you can see for yourself. i'm not a scrapbooker, or a doll maker, or a collager. i am, however, a designer at heart, and i instantly fell in love with Somerset Life, as well as Somerset Holidays & Celebrations. the pages abound with wonderfully inspiring photos and ideas, featuring a lot of artisans that i was surprised to find myself familiar with either from my favorite etsy sellers or blogs. i was literally charmed as i turned each page...

my experiments with crepe paper have given me an appreciation for the plasticity, if you will, of a sheet of paper. actually, i was taught to recognize this unique characteristic back when i was a grad student studying architectural design. there are a limitless amount of possibilities for transforming a flat, plane of paper into something more dimensional, something whose presence in space is completely different just because you folded or rolled it. so basically, what i'm getting at here, in a totally verbose way, is that i like making ruffles with sheets of crepe and ribbon. so naturally, i was totally taken with a picture i found in this issue of Somerset Life of a large pom pom ball made of tea stained coffee filters. i immediately imagined at least ten to twenty of them hanging from the ceiling of my studio...
however, since i currently find myself creating romantic little confections for the shop, i dreamt up a little valentine's day project using coffee filters dyed with food coloring. you can purchase the finished product in my shop, but i enjoyed playing with this otherwise mundane medium so much, i thought i would demonstrate the process for you. this is also a great project for the novice crafter, or even as a rainy day craft with the kids.

here's what you'll need:

  • package of plain 'ol white coffee filters
  • food coloring or tea brewed for staining
  • straight pins
  • styrofoam heart or other foam form
  • card stock
  • vintage sheet music or other decorative papers
  • vintage trim or other ribbons
  • glitter
  • glue gun
here's the how-to:

you must begin by staining or dying your coffee filters. the number you choose to whip up is really dependent upon how large of an application you're using them for. i do a bunch more than i think i will need, because i know i want a nice, fully look at the end. next, you must decide whether you're going to use a tea stain or a food coloring dye. for this project, i used red food coloring, in three different concentrations or shades. i simply filled a large, white bowl with water, dropped a few drops of coloring in, and mixed. when i was done dying a number of filters with this shade, i simply added a few more drops of food coloring to the same bowl of water in order to deepen the color. i did this three times, but there is no precision to this craft! do as many shades as you like...do a number of different colors...whatever! that's the beauty of this -- there is absolutely no wrong way to execute this!


now, before i dip my filters into the dye, i pinch them at the center and twist them into a bundle of sorts. then, all i have to do is dip them in the dye bath, and then gently squeeze them out. i lay the stained/dyed filters on a large tinfoil lined cookie sheet and place them in the oven on its lowest setting to dry. you could air dry the filters, but i'm ridiculously impatient when it comes to these things. even with the oven, the drying process will take at least an hour. during that time, keep a close eye on them, and turn them often, fluffing them gently open to facilitate drying.


finally, when these babies are all dry, its time to craft up something sweet with them. i chose to affix them to a heart shaped piece of styrofoam that i picked up at my local craft shop. i simply put a dollop of hot glue on the filter's pinched end, stand it up on the styrofoam, and then for a little extra hold, i stick a short straight pin through the filter and into the styrofoam. you want to place the filters rather closely together, but try to space them evenly. the fullness of your finished product will vary depending on how many filters you use and how closely they are placed together. to make the aforementioned pom pom, you would simply use a styrofoam ball (does anyone else find the price of these things as ridiculous as i do? what is it about styrofoam that makes it so damn expensive??).


finally, to complete the heart project i have above, i affixed a piece of sheet music to the back of the heart. i then trimmed the styrofoam heart off with a strip of pink card stock that i cut with a pair of decorative scissors by hot gluing it tightly around the edge of the heart. i also added a strip of velvet rick rack for some extra detail. my final touch was a banner reading "BE MINE" in a decorative font, printed on white card stock, and trimmed out with some vintage glass glitter.


my hope in sharing this little project with you all is that you have just as much fun playing with the process as i did...if you make something great, send a pic in and share! i'd love to see what you all come up with!

Tuesday, October 6, 2009

must be the season of the witch...

anyone who knows me even a little bit, will tell you that i'm absolutely obsessed with halloween. it truly is the high holiday for me, easily surpassing christmas and my birthday. i think i adopted this hallow's eve craze from my cousin, annette, whom i was quite close to as a child. she would take my brother, sister, and i trick or treating every halloween, blocks and blocks in either direction, making sure we hit the pizzerias and the taverns along the way. she liked to scare, and she liked to be scared. it was because of her that i learned to have fun with my fears. as i grew older, i came to appreciate the meaning and the symbolism of the holiday, and as an adult, i truly revel in the spirit of the season.


when it comes to all hallow's eve, i do it all. i carve intricate pumpkins and jack o'lanterns; i sew my own costumes; and i design and create my own decorations and props. i prefer a vintage aesthetic, like the old Dennison Crepe Company decorations, Beistle pieces, and of course, Bethany Lowe's reproductions. for me, crafting the halloween spirit is all about getting back to basics, or highlighting what the holiday is really all about -- the passing of the harvest, the honoring of the dead, witches, jack o'lanterns, and magic.
i have boxes and boxes of halloween decor stacked in the basement, far more than my christmas trimmings. i like to stage little scenes throughout the house...for instance, my living room hearth is where the cauldron and the broom go...the coffee table is stacked with vintage books with creepy titles (including some E.A. Poe, of course) and lots of candles...pumpkins of all shapes and sizes are scattered throughout the house...i hang a long black vintage party dress in the corner of the entry hall, along with a witch's hat, her broom, and a book of shadows. i swap out a lot of my off-season decor for the eerie and the mysterious. decorating for halloween should be about creating a mood, whether it be dark and grotesque or more lighthearted. i find that the best decorated homes are those that pick a theme or a story, and go with it. i am partial to a witchy heritage, so i dress my home as though a witch resides within.


last year's big project was carving my own tombstones. i had stumbled upon a number of really great DIY halloween prop websites, and decided it looked easy enough. in the past, martha stewart has also offered a fairly detailed tutorial on creating your own tombstones from sheets of foam insulation board. i decided that we needed to add a graveyard to our repertoire of exterior halloween decor, so i got to carving.


the project turned out to be a lot easier than i had anticipated. and by that, i mean that it was fairly simple for an average person with reasonable artistic capabilities to get a really believable effect. the foam insulation board is fairly inexpensive (about $8.oo a sheet), and can yield up to three or four gravestones, depending on the size. i have been lucky enough to visit some wonderfully old, early colonial cemeteries in new england, and i have always been in love with the simple, gothic artistry of those early gravestones with their winged angel heads and skulls. an exacto knife was all that was needed, as well as a steady hand, to carve the lettering from a template taped onto the foam board's front. once the lettering was carved and cleaned away, it was a quick coat of grey primer and a wash of black paint to age the stone. as you can see from the pictures, it does not take master carving skills to produce a believable gravestone that can be used from year to year.

my other big project last year was sewing my own 'professional' quality witch costume. i fell in love with a bethany lowe figurine of a witch dressed for a ball, and i just had to recreate the look for myself. so, i bought two different patterns, modified pieces, and sewed my costume from scratch. my mom was a huge help, as this was my first time working with a more advanced pattern. she doubted our collective abilities to create what i wanted, but i told her she was seriously underestimating our skills. the real proof, however, was the final result -- a handcrafted witch's hat, an aubergine peasant blouse, a handcrafted velvet corset, a capelet, and a taffeta ball skirt. it came together just as i had dreamt it up, and i loved wearing it as i passed out candy halloween night. and in case you were wondering, the white spectre in the photo is my husband, the hatbox ghost from the original rendering of disney's haunted mansion. we whipped that one up too, though it was much easier than my witch's costume...


last halloween, like every halloween, was such a whirlwind. its a frantic pace in the month or so leading up to the big night, almost christmas-like in the frenzy only much more fun. each year i like to try to outdo myself, but not at the cost of really celebrating and enjoying the holiday and the season. these days, halloween is as big a capitalist machine as christmas is, so i try to create an atmosphere that is more primitive and natural. this year, with the opening of the shop, and its relative success, my halloween preparation has certainly suffered, but with just about two weeks to go, i'm sure i can cast some spells yet before the hallowed night.


what are your halloween preparations like? does anyone have any october rituals or traditions?