Saturday, February 13, 2010

And the winner is...


well, my first blog contest has come and gone...

as expected, turn out was low, but that just means your odds for winning my valentine's vintage wreath were excellent for those who were kind enough to leave me a comment!

first, i would like to thank all of my readers...anyone who stops in, whether it be intentionally or because you stumbled on to me amidst the great worldwide web. if you stay awhile, i'm grateful.
second, thanks to all of you who were kind enough to leave such sweet and heartwarming words for me on my birthday! you should know that comments are always welcome here, and they are often where i cull my greatest inspiration...
so, without further ado, drum roll please...
the winner is: NANCY!
now, nancy, if you're reading, you need to contact me through the blog so i can send you your prize! you are registered as 'anonymous' and i wouldn't want you to miss out! now, for the rest of you, better luck next time! and, hey, if nance does not contact me to claim her prize within one week, i will use my trusty random number generator to produce a new winner. so stay tuned!
and please, please, keep reading!

Sunday, February 7, 2010

its my brithday and i'll share if i want to...


i officially turn 33 on friday, so in honor of my birthday and to celebrate where i am in my life (new beginnings, etc, etc), i have decided to do my first blog contest!


while i realize this may turn out to be a bust, depending on exactly how large my readership is, i'm still pretty happy to share some bday love with those of you out there that do come around to my glittery, dusty little corner of the digital world.


with that in mind, i'm going to keep this first time out simple. here's the deal: all you have to do is leave me a comment on this post -- anything, really. on friday, february 12th at noon, i will use a random number generator to pick the winner.


now, i'm sure you're all dying to know what the prize is...

TAH DAH!! its my vintage heart wreath, featured in my etsy shop for valentine's day. i realize that valentine's day is next sunday, and the winner will not receive this sweet little treat in time. i apologize in advance, but complaints can be lodged with my parents, richard and sylvia, for not getting it on sooner! (giggles...)

so happy birthday to me, and good luck to you all!

Thursday, January 28, 2010

and the coffee filter insanity continues...


yes, it's true...

i am still playing with dyed coffee filters...and i'm still completely taken with the aesthetic concept. its so...fluffy. and romantic. and just plain cheap. AND so simple to do. in the last week or so, i've made a very large pom in a robin's egg blue and taupe for my studio -- this thing ended up being roughly the size, or larger, of a basket ball. it looks so cute hanging in the corner above my sewing table. i plan to do a few more in varying sizes so this one doesn't look too lonely hanging up there by itself. i've also put together this rather large heart that is currently hanging in my entryway. i got the heart-shaped form from Hobby Lobby and just dyed, oh, about two hundred (!) coffee filters pink. it actually didn't take too long. in fact, i thought that the large heart went much more quickly than the smaller heart i showed in my tutorial last week.

what about all of you? have you caught this coffee filter bug yet? if so, what have you whipped up?
this time of year in buffalo can be tough to get through...while we don't really get nearly as much snow as the rest of the world seems to think we do, it can be quite cold and quite gray. i yearn for the sun...the warmth...the garden. its time for me to start my winter sowing, which has turned into quite an ambitious undertaking for me, but one that i am very proud of. last year, i started hundreds of seedlings...all of my perennials and tons of annuals. i only have a small garden in the city (about 20' by 16'), so i ended up gifting a lot of my babies away; but i was so thrilled to have grown nearly all of my garden plants and flowers last year. it was really rewarding to nurse them from tender little seedlings to these lovely flowering beauties, AND i found it helped alleviate some of the winter blues to be looking after something that was alive and growing despite the inches of blowing snow outside the door...

Sunday, January 10, 2010

my newly found obsession: coffee filters and how to dye them


yes, you read correctly. i am currently absolutely obsessed with coffee filters. i'm literally dreaming of them...toying with new ways to use them in my crafting adventures.


and it all began with the latest issue of Somerset Life. now, this is a magazine that i have heard mentioned many times before, but i never really gave it any notice. however i recently found myself killing time at my local Borders, browsing through the magazines. i came across the illustrious Somerset collection of mags, and decided to give them a closer look...
there are a number of Somerset publications, and if you give it a google, you can see for yourself. i'm not a scrapbooker, or a doll maker, or a collager. i am, however, a designer at heart, and i instantly fell in love with Somerset Life, as well as Somerset Holidays & Celebrations. the pages abound with wonderfully inspiring photos and ideas, featuring a lot of artisans that i was surprised to find myself familiar with either from my favorite etsy sellers or blogs. i was literally charmed as i turned each page...

my experiments with crepe paper have given me an appreciation for the plasticity, if you will, of a sheet of paper. actually, i was taught to recognize this unique characteristic back when i was a grad student studying architectural design. there are a limitless amount of possibilities for transforming a flat, plane of paper into something more dimensional, something whose presence in space is completely different just because you folded or rolled it. so basically, what i'm getting at here, in a totally verbose way, is that i like making ruffles with sheets of crepe and ribbon. so naturally, i was totally taken with a picture i found in this issue of Somerset Life of a large pom pom ball made of tea stained coffee filters. i immediately imagined at least ten to twenty of them hanging from the ceiling of my studio...
however, since i currently find myself creating romantic little confections for the shop, i dreamt up a little valentine's day project using coffee filters dyed with food coloring. you can purchase the finished product in my shop, but i enjoyed playing with this otherwise mundane medium so much, i thought i would demonstrate the process for you. this is also a great project for the novice crafter, or even as a rainy day craft with the kids.

here's what you'll need:

  • package of plain 'ol white coffee filters
  • food coloring or tea brewed for staining
  • straight pins
  • styrofoam heart or other foam form
  • card stock
  • vintage sheet music or other decorative papers
  • vintage trim or other ribbons
  • glitter
  • glue gun
here's the how-to:

you must begin by staining or dying your coffee filters. the number you choose to whip up is really dependent upon how large of an application you're using them for. i do a bunch more than i think i will need, because i know i want a nice, fully look at the end. next, you must decide whether you're going to use a tea stain or a food coloring dye. for this project, i used red food coloring, in three different concentrations or shades. i simply filled a large, white bowl with water, dropped a few drops of coloring in, and mixed. when i was done dying a number of filters with this shade, i simply added a few more drops of food coloring to the same bowl of water in order to deepen the color. i did this three times, but there is no precision to this craft! do as many shades as you like...do a number of different colors...whatever! that's the beauty of this -- there is absolutely no wrong way to execute this!


now, before i dip my filters into the dye, i pinch them at the center and twist them into a bundle of sorts. then, all i have to do is dip them in the dye bath, and then gently squeeze them out. i lay the stained/dyed filters on a large tinfoil lined cookie sheet and place them in the oven on its lowest setting to dry. you could air dry the filters, but i'm ridiculously impatient when it comes to these things. even with the oven, the drying process will take at least an hour. during that time, keep a close eye on them, and turn them often, fluffing them gently open to facilitate drying.


finally, when these babies are all dry, its time to craft up something sweet with them. i chose to affix them to a heart shaped piece of styrofoam that i picked up at my local craft shop. i simply put a dollop of hot glue on the filter's pinched end, stand it up on the styrofoam, and then for a little extra hold, i stick a short straight pin through the filter and into the styrofoam. you want to place the filters rather closely together, but try to space them evenly. the fullness of your finished product will vary depending on how many filters you use and how closely they are placed together. to make the aforementioned pom pom, you would simply use a styrofoam ball (does anyone else find the price of these things as ridiculous as i do? what is it about styrofoam that makes it so damn expensive??).


finally, to complete the heart project i have above, i affixed a piece of sheet music to the back of the heart. i then trimmed the styrofoam heart off with a strip of pink card stock that i cut with a pair of decorative scissors by hot gluing it tightly around the edge of the heart. i also added a strip of velvet rick rack for some extra detail. my final touch was a banner reading "BE MINE" in a decorative font, printed on white card stock, and trimmed out with some vintage glass glitter.


my hope in sharing this little project with you all is that you have just as much fun playing with the process as i did...if you make something great, send a pic in and share! i'd love to see what you all come up with!

Monday, January 4, 2010

hello, 2010...


for those of you who haven't lost interest yet and are still checking in, i thought i would drop in and leave a quick post to get you all up to speed on what's been going on for The Crepe Confectionary...
christmas sure came on like a freight train, didn't it? it seems like just a few weeks ago i was still raking leaves and carving pumpkins, enjoying the final sunny days of our indian summer. i started the noel season with a ton of ideas for products and projects for the shop, but found that there just wasn't enough time available for a prolonged 'exploratory' process when it came to designing new pieces. therefore, i found it necessary to organize my christmas line so that i had a handful of pieces varying in size, detail, and price point. i made certain that i had a small items, such as ornaments that could be used for display on the tree or as extras on gifts. there were also some midsize pieces, such as fancy word banners and tussie mussies. i even designed and handcrafted my own version of the Eiffel Tower, bathed in glitter and adorned with a crepe rosette. in fact, many of the pieces in my christmas 2009 line were french-inspired, and if you're at all interested, you can still view them in the shop to your right. and then finally on the more involved, and therefore more expensive, end of the line, i crafted some larger, vintage inspired "Putz" style christmas village houses. there were snowy little cottages atop boxes covered in vintage sheet music, as well as larger scale glittered houses and a chapel complete with their own charming little scenes.
the christmas season was also remarkable for The Crepe Confectionary because it participated in its first exhibition/show. while the show was by no means a large scale, full fledged craft festival, it did provide me with an invaluable first time experience as i begin this journey into the craft fair world. the buffalo indie market (buffaloindiemarket.com) is a monthly gathering of local artisans and vendors in a relaxed, casual atmosphere (a brewery, actually). one saturday a month, buffalonians can shop the wares of smaller, independent artisans while sipping alcohol. this, in my humble opinion, is just pure genius. participating was definitely a stress i did not count on for the christmas season, but i am thrilled that i was given the opportunity to set up shop and put myself and my little confections out into the world amongst such talented and wonderful people. it really gave me a sense of community and belonging to something bigger, and i think as an independent business owner/artisan, that is so very necessary. sometimes whiling away in the studio can get lonely, and just plain isolating...
and so, i will try to pick up where i left off...i have a ton of resolutions for the new year, both for myself personally, as well as for my business. i strive to develop a solid business plan...research and apply for grants...establish and stick to a more sensible work routine...refine my packaging...design my show space/experience...and finally, participate in at least five craft shows this year.
tall order? probably, but i think its doable. and really, its necessary. if i am earnest about pursuing this ambition of mine, i need to treat it with all seriousness. so in this coming year, i need to determine if -- and just how -- viable The Crepe Confectionary is...i need to know if i can support myself, at least at some point in the near furture. that, my friends, is my measure of success...

Sunday, November 8, 2009

christmas crafting has begun...

a 'snow' banner that is currently for sale in the shop...
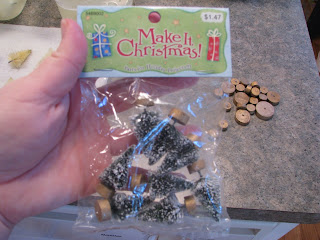
i know, i know...i'm sooo late on this, i'm sure. i can hear all you seasoned crafters and shopkeepers out there shaking your head and laughing at me right now. you're thinking, 'silly girl, you're a whole season behind if you're just starting your christmas crafts...'

and you're right. i am. and in defense i will say that i just began my shopkeep adventures, and hopefully, by next christmas, i will be on target with the rest of you.

but for now, i remain a happy crafter that doesn't know any better...except i do know better when it comes to crafty experiments in the kitchen. and lucky for you, i'm going to share my latest crafting experiment, and save you some money on at least a small portion of your seasonal decorating and crafting this year.

if you love vintage like me, then you probably love the look of old white bottlebrush trees dusted with glass glitter or mica when it comes to christmas decorating. and, if you're like me again, you hate paying ridiculously for the reproductions. and these little guys are pretty hard to come by in antique stores...at least the decent looking ones. so, i got to thinking, why not make my own?

i have discovered that with a package of store bought green bottle brush trees from Michael's and a little bleach, you too can have a frosty, white forest of trees all over the place this christmas season.

here's how...
you will need:
a package of cheap bottle brush trees
a bottle of bleach
two plastic containers or bowls for soaking

the first thing you want to do is pull off the wooden base on each tree, and toss that on the side. keep it, because you'll want these guys to stand again -- unless you are going to craft some new bases. pour some bleach, full strength, into one of your containers, and submerge your trees. you don't want to put too many in. give them room to soak. now, WATCH THEM! the bleaching process will happen almost in front of your eyes. let them soak until they are nearly white; i find that this takes approximately 5-7 minutes. then rinse them under water, using your fingers to gently massage the bottlebrush fibers, rinsing away any green dye that may remain. next, you will want to create a second bleach bath in your other plastic container. this second bath is simply to remove any remaining green tint to the bottlebrush. submerge your bleached trees in the second bleach bath, letting them sit for another 5-7 minutes. it is very important to watch your trees! leaving them in the bleach for too long will cause the bristles of the bottlebrush to disintegrate and fall out. you'll want to rinse them well again, under running water, being careful to fluff the bristles on each tree. if they do not fluff, and they just lay flat, it means you have left them in the bath too long.


when you have finished rinsing, just lay them on a few layers of paper towel to dry. once they are dry, you can put the little wooden base back on them, and embellish with mica or glass glitter or little vintage mercury glass beads. go nuts, because it really only cost you a few bucks!

so how do you like that? vintage for less...

happy crafting people!

ps. if you're crafting anything interesting right now, and you would like to share, please send some pics! share them on the blog!

Tuesday, November 3, 2009

Rest In Peace Halloween 2009, i hardly knew ye...


the jack o'lanterns' faces are curling inward, the trees are nearly bare, and there is a new, crisp chill in the early november air here in western new york...


halloween has come and gone, yet again, and i am overwhelmed this year with how quickly it crept up and just how much i heaped onto my own plate. it made for a crazy, hectic, and less enjoyable samhain than i prefer. october was one very busy month for me -- a sister in law got married; another sister in law launched a new cancer research foundation with a rather large, successful benefit; and i took on one too many custom costume requests. the month of october is inevitably a busy one, with my wedding anniversary and my mother's halloween night birthday. so to add these major projects onto an already brimming list of tasks, responsibilities, obligations, and just plain ol' 'i'd really like to's', october 2009 was certifiably nuts.


my niece, sayo, above in her devil princess costume; my husband below her, as 'max' from 'where the wild things are'...
there were many projects i would have liked to have completed to celebrate this year, such as carving more tombstones or finishing the paper mache work on the jack o' lantern head for the scarecrow. instead, i sewed my niece a devil princess costume, my husband a 'max' costume from 'where the wild things are', and a 'queen of treats' custom costume for a client for the shop. i also kept the store stocked and a plethora of orders filled. it would have been nice to have had the time to have gone out and hiked a day or two to enjoy the beautiful wny autumn, or to have done some photo sessions while the trees were full of color. but every year i set my personal bar so high, and the list of objectives gets so long, that i find that it gets harder and harder to find the time to enjoy it all.

needless to say, the lesson learned this halloween 2009 was just how important time management, organization, and learning when its time to say 'no' really is if i am going to successfully run both my life and this small business of mine. around the corner lies christmas, one of my least favorite holidays, specifically because i have found it is just impossible to frantically prepare for two very long days of merriment and enjoy it. nonetheless, i hope those of you reading out there had a haunting halloween...